If you receive an instrument error message (eg. Syringe pump error), then follow the complete Full System Reboot Protocol to clear the error and attempt another sample sequence.
If you are trying to run a new sample sequence and there are no error messages, you may start at the Communication Check section to verify that the system is ready for a new sample sequence.
View the protocol below or download here:
If you are trying to run a new sample sequence and there are no error messages, you may start at the Communication Check section to verify that the system is ready for a new sample sequence.
View the protocol below or download here:
| HMJ Reboot Protocol |
Shutting down the system
|
1. Turn off the Viscometer by pressing the power button on the front face of the instrument.
|
500 series
|

600 series
|
2. Turn off the Hamilton syringe pump by flipping the power switch on the 500 series (left) or pressing the power button on the 600 series (right) on the front face of the instrument.
|
Back Face
|

Right Face
|
3. Turn off the Autosampler by flipping the switch on the back face of the instrument, which is found next to the power cable.
If your system is the HMJ Full Automation package, you will also need to flip the switch found on the right face of the instrument. |
|
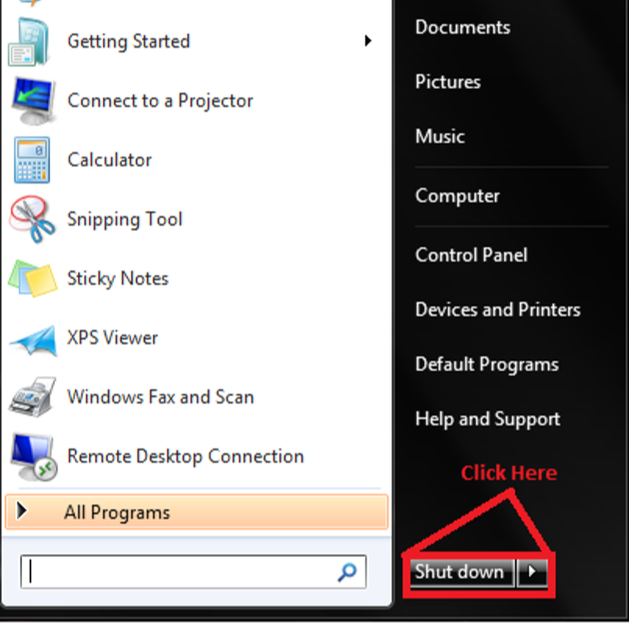
4. Shut down the computer by going to the Start menu and selecting Shut Down.
|
Starting the System Back Up
1. Turn the Autosampler back on by flipping the switch on the back face of the instrument, which is found next to the power cable. If your system is the HMJ Full Automation package, you will also need to flip on the switch found on the right face of the instrument.
2. Turn on the Hamilton syringe pump by flipping the power switch (500 series) or pressing the power button (600 series) on the front face of the instrument.
3. Turn on the Viscometer by pressing the power button on the front face of the instrument.
4. Turn on the computer by pressing the power button on the CPU.
Communication Check
|
1. Start up the ARV Software from the Desktop.
2. Click on Tools, and then in the dropdown menu, select Configure Instruments. |

|
3. Go into the Autosampler tab and click on the magnifying glass button next to the Com Port option and make sure a green checkmark appears on the magnifying glass. If a red cross appears instead, turn off the software, check the wires on the back of the autosampler and repeat this section.
Then click on the square next to Home/Reset and ensure that the needle resets to the correct Home/Wash position. |

|
4. Go into the SASP Balance tab and click on the magnifying glass next to the Com Port option and make sure a green checkmark appears on the magnifying glass. If a red cross appears instead, turn off the software, check the wires on the back of the balance and repeat this section.
|
|
5. Go into SASP Syringe tab and click on the magnifying glass button next to the Com Port option and make sure a green checkmark appears on the magnifying glass. If a red cross appears instead, turn off the software, check the wires on the back of the syringe pump and repeat this section.
Then, click on the square next to Initialize and ensure that the SASP syringe is resets to the correct initial position. |
|
6. Go into the Sample Syringe tab and click on the magnifying glass button next to the Com Port option and make sure a green checkmark appears on the magnifying glass. If a red cross appears instead, turn off the software, check the wires on the back of the syringe pump and repeat this section.
Then, click on the square next to Initialize and ensure that the Sample syringe resets to the correct initial position. |